How do you set up a home voice recording studio?
Is a voice-over studio expensive?
When is a home voice over studio worth it?
We get a lot of questions from new voice over talent about how to set up and build a home recording studio. So take a read of this blog and let all your questions be answered as we walk you through how to build your perfect home voice over studio setup.
How Hard Is Setting Up A Home Voice Recording Studio?
The setup of a home voice over studio isn’t as difficult as you might think. A home voice recording studio can be as complicated as you want it to be, with voice artists using everything from their own custom built booths to converting a cupboard into a makeshift studio. With the right planning and knowledge, you can build a basic home voice recording studio in as little as a few hours.
 Recording technology today is not only more accessible than ever before, but it’s also more portable. So many voiceover talents produce professional quality work from the comfort of their own voice over recording studio. The basic home recording studio needs to be good enough to digitally record and send auditions to a casting director, agent, or potential client.
Setting up a home recording studio for voice over may seem technically challenging at first, but don’t worry!
In fact, it’s simple enough that this blog alone is a short guide for beginners to help you set up a home recording studio from scratch. And if you follow these instructions, you can and will have a home voice recording studio to call your own.
What Are The Basics of a Home Voice Recording Studio?
A basic home voice recording studio needs to achieve 3 key things. It needs to stop sound reflections within the recording space. It needs to keep external sounds out of the recording space. Finally, it needs to offer a constant and repeatable environment so you always sound the same every time you record.
Now before you start cracking out the hammer, nails and microphones, we’ve got to go into a bit of science first.
Don’t worry, we’ll keep it nice and simple, but it’s best you understand how your voice over home recording studio setup actually works, so you not only know how to create it, but also can troubleshoot any problems you run into along the way.
We’re going to break this blog down into 3 parts to help you build the best voice recording studio you can:
1 – We’ll start with the science of a voice-over studio actually works
2 – Then we’ll show you how to adapt your home into a voice recording studio
3 – And we’ll help you build your own voice recording booth in your home
Every step of the way, we are going to focus on giving you the basic, clear and honest information you need to make the right decisions on your voice over studio.
And once you’re all set up, you’ll probably want to think about your voice recording equipment that you’re going to fill it with. We won’t tackle that in this article, but we’ve written another article on voiceover recording equipment that you can look at once you’ve built your own voice recording studio.
Your Voice Recording Studio – The Science of Sound
The goal of setting up a home voice recording studio is to produce appropriately loud, clean and noise-free, high-quality vocal recordings, with no sound reflections.
To help you understand a bit more about sound, here is a FREE VIDEO taken from our course on how to set up a voice over studio at home.
Don’t worry if you can’t watch it right now, all of this information is written below in these 4 major points:
1. Sound Travels and Bounces Off Surfaces
Remember that sound is a physical thing, it’s just vibrations in the air that travel and move and bounce off things.
Whenever you make a noise, imagine that you’re throwing thousands of small bouncy balls out into the world. And now imagine that happening in a small room and you can start to see how the smallest sound can start to interfere with your audio quality.
Starting at the source, sound projects outward in all directions. A small portion of it (known as direct sound) travels in a straight line to the microphone. The remainder (known as reflected sound) bounces off the surfaces of the room. These reflections then reach the microphone. The reflected sound then changes the original sound. How much it changes the original sound depends on the size of the room and the type of surfaces.
2. Sound Absorption Is Vital
Modern sound-absorbing materials are incredibly efficient at absorbing sound reflections. By using these materials that acoustically absorb, the only thing that reaches your microphone and gets recorded is your voice and not those reflections from the rest of the room.
3. Soundproofing Treatments Are Just As Vital
The main priority in your voice over home studio setup is to eliminate outside noises such as people, traffic, weather, plumbing, computer fans, footsteps and many more sounds from getting in.
So always be aware that it’s not only about keeping your own voice reflections under control, you have to be aware of outside noises disrupting your voiceover recording as well.
4. The 4 Methods of Soundproofing
The process of soundproofing a room is accomplished using a combination of 4 tactics:
- Adding Mass: Making sure your walls let as little noise in from the outside.
- Damping: Soft materials dissipate kinetic energy from sound waves (in short, it stops sounds moving around).
- Decoupling: Blocks the transfer of sound and vibrations between the contact points of objects. For example, if you have a microphone stand that is wall mounted you would use a rubber seal between the wall and the mic stand to stop sounds and vibrations transferring between the two so easily.
- Filling Air Gaps: This is about making sure there are no holes or gaps that introduce outside noise.
How Do I Build A Home Voice Recording Studio?
That’s a great question! There are actually 2 ways to do it and you’ll definitely prefer one based on a few factors:
- You can build a physical home voice over booth.
- You can Adapt a part of your home into a voice recording studio (cupboard / utility room e.t.c)
 Since you’re starting out, the second method is usually the best initially for a few reasons.
Firstly, a recording booth for voiceover requires more DIY skill to build.
Secondly, a voiceover recording booth takes up a permanent space.
A voiceover recording booth overall is a bigger commitment when it comes to your voice recording studio.
This is why the adaptation method is far more popular when it comes to building your first voice over studio as it allows you to have a voiceover recording space, without taking up a lot of your living space.
How Do I Adapt A Simple Voice Recording Studio In My Home?
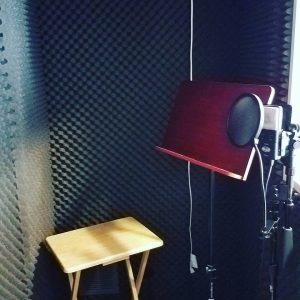
There are many different spaces you can use to adapt your home into a voice recording studio, while not impeding your day to day life. It’s extremely common for voice over actors to set up their first studio in a closet. After all, it’s out of the way, is a nice isolated space and it already contains many useful sound absorption items, such as linens and clothing.
Many voiceover artists will also make temporary structures that they can put up and take down simply whenever they need to record.
However, If you’re building your voice over studio space in a closet, it’s actually best to remove most of the contents or put it far away from the area where you’re actually doing your voiceover recording. This firstly stops you from brushing against them while recording, which will be very noticeable on a sensitive microphone.
But an even more important point is that if you’re using your closet and you’re frequently removing or adding items of clothing, it will make your recordings sound different each time. Try it for yourself and you’ll be amazed at how much removing some absorption from a space will change the sound of your voiceover recording.
 Always make sure your voice recording studio space remains consistent, with as few changes as possible, that way if you ever need to go back and record some additional edits or changes, your voiceover recording will always sound the same.
If you create your voiceover recording space in a closet, remove the existing door and replace it with a heavy fabric secured with Velcro to create the best sound absorption for the doorway.
In general, those are the key things you need to bear in mind when you’re adapting your home into a voice-over studio where you can easily carry out your voiceover recording while allowing you to enjoy your home when you’re not recording.
How Do I Build My Own Voice Recording Studio Booth?
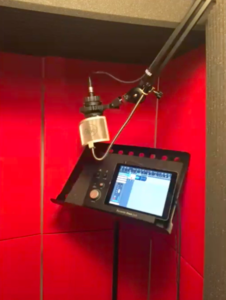
Building your own voice recording studio booth takes planning, materials and time. But there are plenty of resources out there, like this one, to help you achieve that. In simple terms you’re going to be creating a room within a room. You’ll need the materials and tools to construct a wooden booth, as well as install a door and insulate the entire thing with acoustic foam and soundproofing foam.
A basic home voice recording studio needs to achieve 3 key things. It needs to stop sound reflections within the recording space. It needs to keep external sounds out of the recording space. Finally, it needs to offer a constant and repeatable environment so you always sound the same every time you record.
So if you’ve decided to go for it and actually build a voice recording studio booth for yourself, then all of those same rules we’ve gone into still apply. But if you want to build the best voice over studio setup that you can, you’re going to need to do a bit more planning.
In this second short FREE VIDEO, voiceover director Hugh Edwards gives you some important general pointers about creating your own voiceover recording environment.
Voice Over Studio Setup 1: How To Find The Perfect Room and Space For Your Voice Recording Studio
The first thing to consider is space. Ideally, you want a completely quiet room. This gives you the perfect conditions for creating your voice over studio. If you are fortunate to own a house or apartment big enough to dedicate a small quiet room for recording, you will limit ‘noise’ and control the acoustics of your space more easily.
Most build a room within a room or in fact permanently convert a wardrobe or closet into a recording space.
Take a look at the rooms in your house. The ideal room is cosy but comfortable to stand in and you should be able to move around a bit. A room without windows and a heavy door are best. If it has doors and windows, these areas are the most important parts of the room to treat as those are where the majority of the sound quality will be lost.
Voice Over Studio Setup Part 2: How To Soundproof A Room For Voice Recording
The importance of proper acoustic insulation or dampening for voice recording cannot be understated. Make sure that you budget money to do this to a high standard. If you don’t, you may find that you spend all your money on the best voiceover recording equipment, but you still can’t get a professional sound.
Treating a room, even a booth, is very much a science. Professional studio companies that provide the acoustic treatment products often oversell what is actually needed in a home voice over studio. Soundproofing is all about keeping your voice in the room, and all other noises outside of the room.
There is no doubt that a custom-built recording booth for voice over with insulated walls and foam to absorb sound will produce almost studio-level recordings. As we’ve said, for most beginners though this is a later investment. But if you still want a basic studio voice-over booth without spending a fortune, then remember, any soft material can deaden noise.
Small spaces tend not to need as much diffusion as larger spaces, but if your audio plays back sounding dull, throw some corners into your room. Again, acoustic panels work well, but anything with some angles on it will do.
Voice Over Studio Setup Part 3: How To Insulate On A Budget
Install insulation over windows, walls and the ceiling. Cork, rubber, or foam insulations are good options and are readily available from your local home building store. Large pieces of PVC piping strung up around the edges of the room also help to absorb sound.
Alternatively, hang heavy fabric around the room that you may find in your storage room such as thick moving blankets or you could use several layers of heavy old curtains. If the room is cubic, hang fabric in the corners to create more of a triangular shape to the ceiling to lessen echo and boom. It’s also a good idea to hang a duvet or quilt behind your mic to soften ‘esses’ and absorb sound.
How Much Will Setting Up A Home Recording Studio For Voiceover Cost Me?
Frustratingly, the answer to this question is, it depends! However, your budget doesn’t have to be huge and you can come away with a very functional voice recording studio for less than £100.
As we’ve said above, when it comes to isolating noise from your voice recording studio, you can go as expensive as a top of the range acoustic foam, or you can use thick sheets and carpet.
When it comes to your voiceover recording space, you can use a closet, an empty utility room, some well-placed furniture to hold up some sheets, or you can build your own home voice-over booth from scratch to create a truly isolated recording environment.
Of course, the more money you spend on it the better, but when it comes to your budget, you can keep it reasonable and produce a very functional voice recording studio from as much as a few thousand pounds to less than £100.
Do I Need A Home Recording Studio For Voiceover?
Once you have a functional, high-quality voice over home studio setup, then producing high-quality voiceover recording will be much, much easier and faster to achieve. If you want to get started on a voiceover career or simply dip your toe in the water, then there’s no doubt that a home recording studio will be invaluable to you.
But when it comes to the question of being worth it, it’s always best to not lose sight of your objective and why you actually want a voiceover recording space.
- Are you just doing voiceover recording as a hobby?
- Are you voiceover recording to start a career?
- Are you just trying out voice acting to see where it goes?
As always, be aware of how much time and energy you want to budget into your voice acting and then budget a similar amount of money to back that up. Never go overboard and spend thousands, there’s never any need to do that when it comes to just starting out on a venture.
But if you only want to use your voice over studio space every now and then, then keep the budget relative to those needs.
Good Luck With Your Voice Recording Studio
 Good luck with your voice over studio. Whether you’re just interested in learning the basics of the science that goes into voiceover recording, you’re adapting a closet into a voice-over studio or you’re building your own home voice-over booth from scratch; This is the first step towards starting your voiceover journey.
As Hugh mentioned in the earlier video about how to set up a voice over studio at home, there are lots more resources on the internet. But If you want more detailed advice from us, we have our own voice over studio expert Rob Bee.
You can always contact us if you have any further questions or want to discuss having a custom-built home voice recording studio. We’ve built many a custom voice recording studio setup and know exactly what it takes to produce a voice recording space to fit your life and needs.
And of course, if you’re totally new to voice recording and voice acting, you can always visit our series of posts on how to become a voice actor, which has helped hundreds of aspiring voice over actors get to grips with the complex world of voice acting and improve their vocal skills, along with their DIY skills.
[cp_popup display=”inline” style_id=”509696″ step_id = “1”][/cp_popup]
[social_warfare]